




Labeling a slide with a Glass Coverslipper is a crucial step in various scientific and medical applications. As a supplier of Glass Coverslipper, I understand the significance of this process and the importance of using high - quality coverslippers. In this blog, I will share detailed information on how to label a slide with a Glass Coverslipper, including the necessary materials, steps, and some useful tips.


Materials Required
Before starting the labeling process, you need to gather the following materials:
- Glass Coverslippers: Of course, you need a high - quality Glass Coverslipper. Our company offers a wide range of glass coverslippers, including different sizes and thicknesses to meet your specific needs.
- Slides: Clean and dry microscope slides are essential. Make sure they are free from dust, fingerprints, and any other contaminants.
- Labeling Tools: You can use a permanent marker or a label printer. If you are dealing with a large number of slides, a label printer can be more efficient and provide a more professional look.
- Adhesive: If you are using pre - printed labels, you will need an appropriate adhesive to ensure that the labels stick firmly to the slide.
- Tweezers: To handle the glass coverslippers and place them accurately on the slides.
Pre - preparation
- Clean the Slides: Wash the microscope slides with a mild detergent and warm water. Rinse them thoroughly and dry them with a lint - free cloth. This step is crucial as any dirt or debris on the slide can affect the quality of the labeling and the subsequent microscopic examination.
- Prepare the Coverslippers: Inspect the glass coverslippers for any cracks, chips, or other defects. If you find any damaged coverslippers, discard them to avoid issues during the experiment.
- Design the Labels: If you are using a label printer, design the labels in advance. Include all the necessary information such as the sample name, date, experiment number, and any other relevant details. Make sure the text is clear and legible.
The Labeling Process
- Label the Slide:
- Using a Permanent Marker: Hold the slide firmly and write the required information on the frosted end of the slide. Use a fine - tip permanent marker to ensure clear and precise writing. Make sure the ink is dry before proceeding to the next step.
- Using a Label Printer: Cut the pre - printed labels to the appropriate size. Carefully peel the backing off the label and place it on the frosted end of the slide. Smooth out any air bubbles with a flat object to ensure good adhesion.
- Apply Adhesive (if necessary): If you are using pre - printed labels that require adhesive, apply a small amount of adhesive to the back of the label or directly on the slide where the label will be placed. Be careful not to use too much adhesive, as it can spread and affect the coverslipping process.
- Place the Sample on the Slide: Use a pipette or other appropriate tool to place the sample on the center of the slide. Make sure the sample is evenly distributed and not too thick, as this can affect the clarity of the microscopic image.
- Add a Drop of Mounting Medium: Place a small drop of mounting medium on top of the sample. The mounting medium helps to preserve the sample and provides a clear view under the microscope.
- Position the Glass Coverslipper: Using tweezers, pick up the glass coverslipper by the edges. Hold it at a 45 - degree angle and slowly lower one edge of the coverslipper onto the slide, touching the drop of mounting medium. Then, gently lower the other edge of the coverslipper onto the slide, allowing the mounting medium to spread evenly under the coverslipper. This method helps to prevent air bubbles from getting trapped between the slide and the coverslipper.
- Remove Air Bubbles: If there are any air bubbles trapped under the coverslipper, you can try to remove them by gently pressing on the coverslipper with a flat object or by tapping the slide gently on a hard surface. However, be careful not to damage the sample or the coverslipper.
Tips for Successful Labeling
- Use High - Quality Materials: As a Glass Coverslipper supplier, I highly recommend using high - quality glass coverslippers, slides, and labeling tools. This ensures the accuracy and longevity of the labeling and the quality of the microscopic examination.
- Keep the Work Area Clean: A clean work area reduces the risk of contamination and ensures that the slides and coverslippers remain clean during the labeling process.
- Be Precise: Pay attention to the details when labeling the slides and placing the coverslippers. Precise labeling and coverslipping are essential for accurate identification and analysis of the samples.
- Store the Slides Properly: After labeling and coverslipping, store the slides in a suitable slide box or container in a cool, dry place. This helps to prevent damage to the slides and the samples.
Automated Solutions
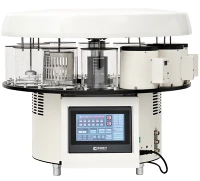
For laboratories or research facilities that deal with a large number of slides, Automated Glass Coverslipper systems can be a great option. These automated systems can significantly increase the efficiency of the coverslipping process and reduce the risk of human error. They can handle multiple slides at once and ensure consistent and accurate coverslipping.
Conclusion
Labeling a slide with a Glass Coverslipper is a fundamental step in many scientific and medical procedures. By following the steps and tips outlined in this blog, you can ensure that your slides are properly labeled and coverslipped, which is essential for accurate sample identification and analysis. As a Glass Coverslipper supplier, we are committed to providing high - quality products and support to meet your needs. If you are interested in purchasing our glass coverslippers or automated coverslipping systems, please feel free to contact us for more information and to discuss your specific requirements.
References
- "Microscopy: A Laboratory Manual" by David B. Fankhauser
- "Practical Histology" by John D. Bancroft and Marilyn Gamble