




Hey there! As a supplier of coverslippers, I often get asked about how these nifty little devices prevent air bubbles in slides. It's a question that's not only important for those in the scientific community but also for anyone who uses slides for microscopy or other applications. So, let's dive right in and explore the ins and outs of how a coverslipper does its job.
First off, let's talk about why air bubbles are such a big deal in slides. When you're looking at a specimen under a microscope, air bubbles can be a real pain in the neck. They can distort the image, make it difficult to see the details of the specimen, and even cause artifacts that can lead to misinterpretation of the results. That's why it's crucial to get rid of as many air bubbles as possible when preparing a slide.


So, how does a coverslipper help with this? Well, a coverslipper is a device that's designed to place a coverslip on a slide in a controlled and precise manner. By doing so, it helps to minimize the chances of air bubbles getting trapped between the coverslip and the slide.
One of the key ways a coverslipper prevents air bubbles is by ensuring that the coverslip is placed evenly on the slide. When you try to place a coverslip manually, it can be easy to get it at an angle or to press down too hard in one area, which can create air bubbles. A coverslipper, on the other hand, uses a mechanism to lower the coverslip onto the slide in a smooth and even motion. This helps to spread the mounting medium (the substance that holds the specimen in place between the slide and the coverslip) evenly and to push out any air bubbles that might be present.
Another way a coverslipper helps to prevent air bubbles is by applying the right amount of pressure. If you press down too hard on the coverslip, you can squeeze out too much of the mounting medium and create air pockets. If you don't press down hard enough, the coverslip might not adhere properly to the slide, which can also lead to air bubbles. A coverslipper is designed to apply just the right amount of pressure to ensure that the coverslip is firmly attached to the slide without squeezing out too much of the mounting medium.
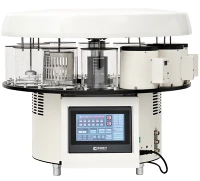
There are different types of coverslippers available on the market, each with its own unique features and benefits. For example, an Automated Glass Coverslipper offers a high level of precision and efficiency. It can handle a large number of slides quickly and consistently, making it a great choice for laboratories that need to prepare a lot of slides on a regular basis. These automated coverslippers often use advanced technology to ensure that the coverslip is placed perfectly every time, further reducing the risk of air bubbles.
On the other hand, a Glass Coverslipper is a more traditional option. It's simple to use and can be a good choice for smaller laboratories or for those who don't need to prepare a large number of slides. Glass coverslippers are usually made of high - quality glass, which is durable and can provide a clear view of the specimen. They also allow for a certain level of manual control, which can be useful in some situations.
Now, let's take a closer look at the process of using a coverslipper to prevent air bubbles. First, you need to prepare your slide and the mounting medium. Place a small drop of the mounting medium on the slide where the specimen is located. Then, load the coverslip into the coverslipper. The coverslipper will hold the coverslip in place and position it correctly over the slide.
Next, the coverslipper will slowly lower the coverslip onto the slide. As it does so, the mounting medium will start to spread out evenly. The key here is to let the coverslipper do its job and not to try to rush the process. If you try to force the coverslip down too quickly, you're more likely to create air bubbles.
Once the coverslip is in place, the coverslipper will apply the appropriate pressure to ensure a good seal. After that, you can let the mounting medium dry. As it dries, it will hold the coverslip firmly in place and further reduce the chances of air bubbles forming.
It's also important to choose the right mounting medium. Different mounting media have different viscosities and properties, which can affect the formation of air bubbles. Some mounting media are designed to be more fluid, which can help to spread out more easily and push out air bubbles. Others are more viscous and can provide a stronger seal, but they might require a bit more care when using a coverslipper.
In addition to using a coverslipper, there are a few other tips you can follow to prevent air bubbles in slides. For example, make sure your slide and coverslip are clean before you start. Any dust or debris on the slide or coverslip can create air pockets. You can clean them with a lint - free cloth and a suitable cleaning solution.
Also, when you're working with the mounting medium, make sure it's at the right temperature. If it's too cold, it might be too thick and difficult to spread, which can lead to air bubbles. If it's too hot, it might evaporate too quickly, also causing problems.
In conclusion, a coverslipper is an essential tool for preventing air bubbles in slides. Whether you're a professional scientist or an amateur microscopist, using a coverslipper can greatly improve the quality of your slides and make your observations more accurate. If you're in the market for a coverslipper, we offer a wide range of options to suit your needs. Whether you need an automated solution for high - volume slide preparation or a simple glass coverslipper for occasional use, we've got you covered.
If you're interested in learning more about our coverslippers or have any questions about how they can help you prevent air bubbles in your slides, don't hesitate to reach out. We're here to assist you with all your coverslipper needs and to help you find the perfect solution for your laboratory or microscopy setup. Contact us today to start a conversation about your requirements and let's work together to get you the best coverslipper for your situation.
References
- General microscopy textbooks on slide preparation techniques
- Manufacturer's guides for different types of coverslippers